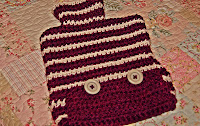
I was racking my brain for a last minute quick and easy gift for my mother in law as I seem to have left yet another one to the last minute! I thought a hot water bottle cover would be perfect for this time of year. This is a nice easy pattern which is pretty quick to make.
I used two different colours of thick yarn and a 5mm crochet hook.
.Begin by chaining 54 of your first colour. Sl st together.
. Sc into each chain. Change colour and repeat another row.
. Change colour and repeat for 2 more rows.
. Repeat this pattern for another 18 rows.
 |
| Forming the main body. |
. Sl st the top of the sack together for 9 stitches. Tie off and repeat on the other side. You should be left with a hole in the middle.
. With your other colour sc around the hole.
. Change colour and sc twice into same stitch. Repeat until the other side and sc twice into same stitch. Sc to end of row.
. Change colour and repeat for two more rows, including the increase by 1 sc at each end.
. Change colour and repeat.
. Repeat for 3 more rows.
You should then have your basic bottle cover. To make a flap for the bottom to keep the cover on, sl st into 2 first stitches of bottom row. Sc into following 22 stitches. Sl st into last 2 stitches.
. Repeat sc for another 7 rows.
. For button holes, sc 4, chain 3. Skip next 3 stitches. Sc 8, chain 3, skip next 3 stitches. Sc another 4.
To finish off, fasten two buttons at the appropriate place on the main body of the bottle.
There you have it! If you're quick this can be knocked up in one evening.
Let me know if you have any suggestions or improvements. It's a quick simple pattern but could be jazzed up with a nice cable stitch or additions.
Enjoy!
 |
| The finished result. |
Emma :) xx

Can you give more of an explanation for the step "Sl st the top of the sack together for 9 stitches. Tie off and repeat on the other side. You should be left with a hole in the middle." I'm relatively new to crocheting and this doens't make sense to me.
ReplyDeleteHi Kacie, so sorry I have taken so long to reply to you! As you can see I haven't blogged for a while! Essentially this means sew the top of the sack together on each side to the distance of 9 stitches each side, leaving the gap in the middle. My way of describing is slightly strange, but it means pulling the yarn through each chain on each side of the sack so it pulls it together with your hook, or 'slipping' the yarn through. You can achieve exactly the same effect by using a yarn needle to sew it together, so whatever suits you :)
Delete